Tuesday, August 23, 2016

Safety Nest

Since 2012 we have been using a Honeywell YTHX9421R5077 Prestige IAQ 2.0 Thermostat Kit.

Its has worked well for us and gave us some features that were unavailable elsewhere.  I purchased it for the humidity management feature,  for the remote control and remote sensing, and the web access.

Due to some project scope creep, needing to purchase some new Fire Alarms, I decided to 'embrace' the Nest community and purchase the Nest Thermostat as well.

The thermostat is on it's third generation and now has most ( other are coming ) features that I wanted in my home comfort control.

Of course there's the nest app that gives you control via your phone.  They also have a feature called "Cool to Dry" which will manage the house's humidity.  Also with the in home occupancy sensing it can adjust the thermostat based on our actual schedule and not some hard coded guess.

One thing that is currently missing is the remote sensing.  I had assumed ( wrongly ) that the connected Nest Protect smoke alarms would act as remote sensors but that is currently not the case.  Apparently this feature will soon be available as a "Works with Nest" product.  Looking forward to that.

Installation Trickery

When viewing the installation instructions the mounting bracket makes it clear that the Nest can handle quite a bit.  There are enough ports for up to 10 different wires.  Thinking I would be clever I went to Lowes and purchased 25 feet of 18/10 Sprinkler Wire.

The previous thermostat only used two wires between the wall and the controller module on the furnace.  I needed new wire anyways and I opted to use this.  I figured I would be saving myself some time in the future when we add or change furnaces.

I then proceeded to wire up the nest base using all of the wires.


Now, I didn't need to use all of these wires.  I thought I was just getting ahead and being "smart".  My current system is a forced air, gas two stage furnace with a single stage AC.

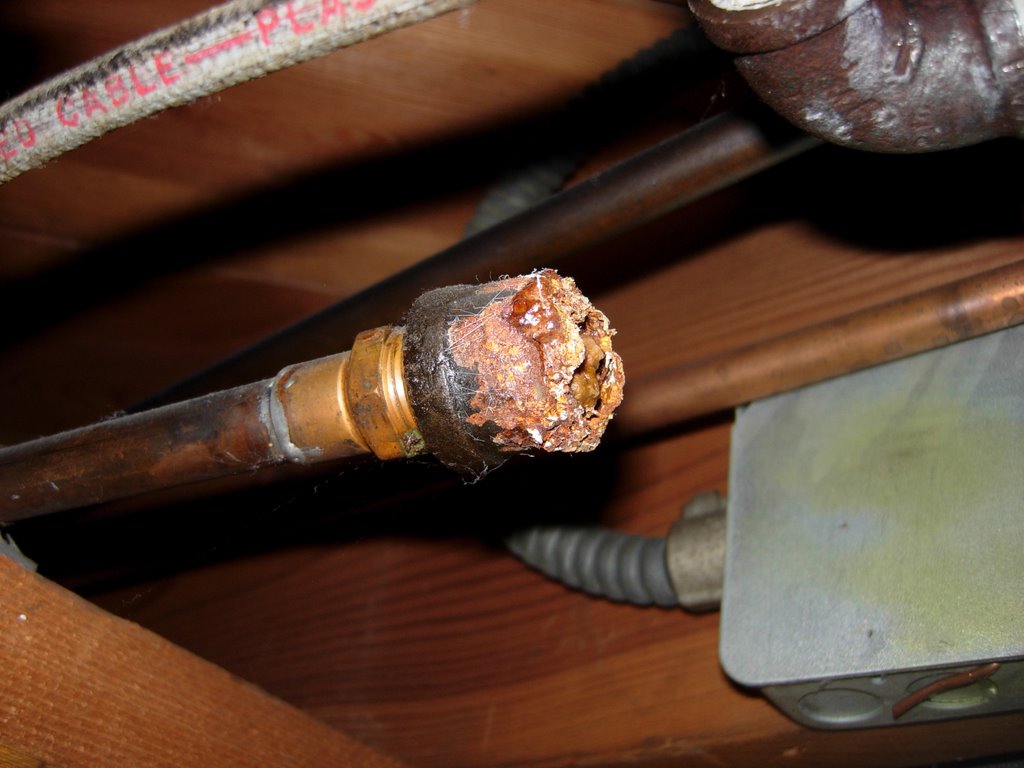
Furnace hookup.  Note the AC was not connected yet.

Well, the Nest Thermostat didn't like this one bit.

I proceeded to check the wiring again, a couple of times, as well as make sure I was receiving 24v power at the furnace and in the Nest base between the common and the Rh.

After a lot of scratching my head, I wised up and thought that Nest was trying to outsmart me and it is able to sense the wires ( though not connected at the furnace ) and predict what type of HVAC system. Once I removed the wires to be only the ones my system requires then Nest was pleased and is now operating well.

It's been a while

Any information or history on what happened to http://www.houseblogs.net/ ?

Any suggestions on where to link to now ?

Wednesday, July 29, 2009

Desert Springs in my Bosch

As I’ve pictured before my humidifier gets pretty nasty, even with the auto-flush installed.
I finally got around to putting it into the dishwasher, with the power scrub feature and it came out looking pretty clean.  It looks like it will be a viable option to do this a couple of times over the winter.
Though now I’m thinking about getting one of these…….


I scoff at the “requires professional installation.”  HA!

Tuesday, April 24, 2007

Desert Spring results

Here's a couple of pictures of my Desert Spring humidifier after the 06/07 season. This was in operation for about 5 months, and has the auto flush unit attached. It seems again that the auto flush has jammed again, and will need repair or replacement. I'm guessing that little flakes of scale get caught in it. This is the first year I used the auto flush, and though it is still moldy and cruddy, it is also a lot less moldy and cruddy from years past.


Friday, April 20, 2007

The perfect dining room light

Too bad we don't own the house it's in. I could use some information on this one as well. I guess I could write the new home owners. The house this light is in was built in '41 so I think it's the right period.

In search of Halcolite

The previous homeowner replaced a few lights in our house, Fortunatly this one remains. We're in search of a replacement for the dining room. In the meantime can any one give us information on this one, that's in our guest bedroom. It seems that most of the indoor lights in the house are Halcolite. This one has a UL sticker with 13471.


Buzz off peckers

I want some opinions on if this is wood pecker or carpenter bee damage. There are some pictures of old, now painted damage, and some fresh this year. I've got smaller holes that don't go all the way through, so I'm guessing wood peckers.

Also if anyone can help with information on repairing a hole in a cedar shingle that would be great!

Tuesday, January 02, 2007

Curtis Birch china cupboard


Sure is pretty. I'm thinking this is from the same Curtis company that made my screen doors.
I can't find any marks on it that identify it though.

Update:  Thanks to the poster and some additional work.  I was able to procure a Curtis catalog and it appears that most of the house was outfitted by the Curtis Company.  Additionally, the census became available for when this house was built.  The original owner is listed as a Hardware Salesman.  I wonder if there was a connection.

Update on Old time waterproofing

We're lucky enough to have all of the documents of when this house was built, including the contract, blueprints for the house and landscaping, and the original price list.

We need to have these documents these preserved before they deteriorate more. Suggestions?

Anyways here's some information about the funny, bentonite like coating that I've talked about before. The contract gives insight.


BASEMENT WALLS

Recreation room and office in basement concrete block walls shall be coated with 2 coats of "Cementico", color as desired.


Some basic searching on Google shows that it's calcimine paint, translation: whitewash. I would appreciate more information if anyone can aid.

Basement Walls

The long term study is over, and I've had lots of people asking how it's gone. Well, after reviewing the results I would have to say they have been a little disappointing. I probably have spent nearly $1000 in Xypex and PeelAway, and I have acid washed and used a grinder to clean the walls. As I've mentioned before after I preped the surface and applied the Xypex, I still had some efflorescence coming through the walls after a couple of months. Now nearly a year later, I've had large areas of Xypex peeling off the walls. After some reflection and a look at some costs I've decided to go another way.


Ta-Da! Wallmate, by Dow Corning. I put this up, about 26 sheets, in about 4 hours, by my self, with a powder actuated nailer and cost under $300. Drywall estimates are about $500 to $700. The estimates are about a $1.25 per square foot to hang and finish. My wife was duly impressed when she came home from work one day. I really wanted the two inch, but it was hard to find so I ended up with the 1.5 inch and it's been an incredible improvement. It’s already warm and much quieter. Just rest your back against the walls and you feel hot in only a minute.

The powder nailer worked great. I would recommend spending the extra bucks and get the trigger fired. I had trouble hitting the hammer fired while I was holding two sheets and a furring strip. Also sometime the charge would fall out. The trigger helped out big time. For my 70 year old concrete block walls I used 2.5 inch nails and a charge rating of 3. The nailer is made by Remington. Most of the nails a properly countersunk, but I’ve had a few which I just tapped in the rest of the way with a hammer.

Wednesday, September 13, 2006

We're live!

Well sort of, From May '05? Window's live has updated with more birds eye photots including our village. What gives with these being taken so long ago? Looking at some area contruction and trees my best guess is that these are from around mid May '05.

FRONT


BACK

Sunday, August 20, 2006

What the heck is this???


What do you call them and more importantly, where can I get some more! I swiped this picture from Vintage House Parts. They referred to them as knobs (pulls) but that's not what they are for. These little brass doo-dads are stamped with "Curtis 1866" and have two brass halves and a brass screw to connect them. These are to hold in the inserts (either glass or a screen) in my storm/screen doors. Each end goes on either the inside or outside of the door and their wide enough to hold in the glass/screen insert. Problem is I don't know what they are called. I've checked all of the vintage screen door companies that I could find and they use something else now. I summon the houseblogger community to leverage our collective knowledge and to do my bidding

Wednesday, August 16, 2006

SharkBite

I might have mentioned earlier about some dumb ass plumbers that the PO had and they capped a copper pipe with a steel cap. This is a bad idea as the dissimilar metals will create a galvanic reaction. Oh, that's stupid gutter installers. Anyways, a galvanic reaction is a little like a battery, and causes the "less noble" ( think left side, away from the noble gasses on your periodic table) to corrode. Insert exhibit "A"... A galvanic reaction.


Enter Exhibit "B" a SharkBite. This is a half inch cap that has little teeth which will hold the cap into place. All I need to do is create a clean cut and shove this little sucker on the pipe, which is half inch.

A SharkBite Cap...


The Finished Product....


Now, of course this project should have only taken 5 minutes, but there were some technical difficulty with cutting the pipe cleanly and I needed my sawzall to remove some of the old drop ceiling in the basement ( which was coming out anyways). There was a little collateral damage.

These shark bites appear to be a great thing. The half inch cap cost me $4.09 plus tax, but it did save me the trouble of breaking out the torch and burning the house down while using it. It's also reusable with their little doo-hicky. One bonus with these is you can use any one of them to connect dissimilar pipes like copper to CPVC or PEX. I think will try these again!

Update:  Thanks for the comment.  I suppose that explains why the SharkBite is also corroding.  Also I was wondering if it's possibly having a reaction because of other locations that have iron attached to the copper and many of the pipe clamps are also steel.

Monday, July 10, 2006

Indoor air quality

Could it be possible? Could we possibly have made things worse in the house. I think it's too early to tell but there seems to be a trend. Here are a few things we’ve noted so far, and a few re-visits of our previous work.

First the problem. Though this summer is cooler than last year, but it is more humid in the house. The indoor humidity hovers around 60% these days. Last year the house was pretty comfortable at 75 d.f. but now the humidity is high. To combat this we’re lowering the thermostat down to 73 (depending on the wife) which helps the humidity but also makes it like an ice box in the house. We have an exhaust fan in the bathroom that we use, and there is water in the drain tube for the AC. So what’s the deal? Also I fixed the bathroom fan to vent to the outside. Here’s my guess.

Of course it probably depends on a number of factors. First we added a Gable attic fan and more insulation into the attic, making the house more comfortable and tighter. This means the AC doesn’t need to work as hard to cool, but now doesn’t run enough to dry the air. A catch-22 if you ask me. Also with screwing around with the waterproofing in the basement, where we have more efflorescence popping off the Xypex and will need to be patched in about a dozen spots. So there’s moisture migrating through the walls into the house. I know some moisture comes through the basement around the furnace because of the efflorescence that appears under things that I place around there. Perhaps now that the gutters are using the underground drains there’s more water around or under the house.

Solutions??? We’re going to un-borrow our de-humidifier and start running it, and see if we can regulate the basement’s humidity. So much for saving electricity. In these utilitarian areas I might add a liquid rubber sealant. In the future we might get an Energy Recovery Ventilator. So far I have not seen any housebloggers DIY one of these.

Tuesday, June 13, 2006

Attic insulation update

The attic insulation sure seems to make a difference. Not really a big one but it seems much better. I installed a new Attic Gable fan and that seemed to be making a difference too of a few degrees in the upstairs. Unfortunately the fan died after only ONE WEEK. Now I need to climb back up there, and dig through the insulation, and remove it so I can get it replaced.

Also, Lowes was nice enough to take back the previous whole house fan. No questions asked!

The new whole house fan works and runs great.

More on Xypex

The weather here has been nice, so of course I have been out side battling, Garlic Mustard, poison ivy, bush honeysuckle, ground ivy, poke weed, nightshade, strawberry and other invaders.

The other day I stopped back in the basement to see how the waterproofed walls were holding up. (Seriously, some day I'll post pictures ) The results are fairly good. I do have two small areas where the Xypex is peeling off the wall, about the size of a playing card. I have wisps of efflorescence in a couple of areas, though not where I would have expected. I figure I'll need to grind down these areas, acid wash them then re apply. About a dozen bricks look like they are permanently wet, they have dark splotches on them. Incidentally some of these splotches are the same areas as where I have efflorescence appearing. All in all, it's working about as I expected. I figured I would need to do some touchups.

Thursday, May 04, 2006

Insulation Culmination

Finally! A project that's completed! Well for now at least. The new cellulose has been blown into our attic and it looks good. It is perhaps a little thinner than I had anticipated, but I can always get more put in later. I wanted it for the winter, but now we'll see how it handles the summer first. It has been sunny though cool the last week, perfect WHF weather. Good thing I did it this year, as it's tax deductible.

Quiet spring breezes

A few notes to wrap up the Whole House Fan debate.

First, thanks to WholeHouseFan.com for helping out with ordering and getting it shipped to me. It arrived here quickly and on time.

Though I didn't take any pictures, the two fans look very similar. They use the same size rough opening (almost) and it was a snap to remove the old one and replace it with the new one. The Tamarack (TWHF) I ordered was the HV1600-GDR. So it comes with the extra insulation, and the remote, and a plug? I don't know if that's common or not but it came with a three prong plug to be able to plug it in. I ended up removing it so I could hard wire it like all other WHFs I've known. I don't have too many sockets in the attic. I attached it to its box with 4 screws ( they supplied 6 ) and attached the wire. Added a little spray foam to make the seal tight ( they shorted me the foam gasket), and I was done.

Operation is A LOT quieter. My previous calculations for Dbs and Sones sound accurate. We can easily leave it on low all night and not annoy the baby or ourselves, watch TV etc. High is loud but quieter than the other fan's low. It should improve when I install the supplied grill. The WWHF has two large metal blade fans that take the entire cavity, where TWHF has two smaller plastic bladed fans.

The remote is fine and works from the first floor; One is for On/Off and Two toggles the speed. Startup of the TWHF is a little slower than the WWHF. The TWHF opens its shutter all the way first then starts where the other starts as the shutter is opening.

Now I just need to return that old fan.... where is that receipt?

Friday, April 21, 2006

More information about WhisperAire vs. Tamarack

Ok, to whoever was the snotty, anonymous commenter on my blog back in February, I still want to say a hearty "Bite Me!"

But anyways, the joke's on me though. Today I ordered a new "Gold" HV-1600-GDR from wholehousefan.com It should be in a couple of weeks. Hopefully the snafu of my creditcard thinking it was stolen after my trip to Seattle has been cleared up. I'm also still waiting on my return box, and I need to start looking for the Lowes receipt too. I hate to think of the money I've wasted not returning something timely, or having a receipt, and arguing with (insert hated bog box corporation here ) about some stupid return policy. Anyone need fluorescent lights or Cannon ink with a "6" on it?

Here's some more information that I would like to share that I could not find on the web.

The sone level for the HV1600 on low is 3 sones and on high is 6 sones.

Now wait, I'm dealing in decibels (db) what the heck is a sone? I knew my old bathroom fan was measures in sones, but I want to compare. I found this formula on the web....

db = 33.2 * LOG10(sones) + 28 : this has an error of 2db, plus or minus.

Therefore 3 sones = 43.8db ( whisper) & 6 sones = 53.8 db (talking) <-- That's still less than the WhisperAire

Now that's not a direct comparison but it does give an idea, if you want more information then check out Wikipedia.

Wednesday, April 19, 2006

Back it Goes!

In an earlier post I mentioned about the noisy factor of my WhisperAire whole house fan. I finally got around to contacting the company about this and this is what they said....

WA: "The decibel rating on low speed is 75 and on 5th speed is 87"
ME: So why is it called Whisper?
WA: “The name was given to the fan because it went along with the WhisperCool name we were already using on our gable vans.”

That's like a Vacuum Cleaner, and ours does sound like one too. So it's going back. They are nice enough to send me a new box so I can return it to Lowes. I hope Lowes will take it back, and not for store credit.

Has anyone used www.wholehousefans.com?

Thursday, March 23, 2006

Crocus'


I hear these are not native, but they sure are beautiful.

Tuesday, March 14, 2006

Xciting Xperience Xwith Xypex

Well, it wasn't that exciting. I took last Saturday to put up the Xypex HD-150. I ordered 4 twenty-pound tubs for two coats. Opening the Xypex is that it appears to be mostly Cement, and that's where they hide the directions. In my usual way, I didn't bother wearing gloves while mixing and applying the stuff. After two hours and using about 50 pounds of the stuff, I had received a nice chemical peel on my hands. The abrasiveness of the cement I'm sure also helped.

I mixed it in the ratio expressed as 5 parts powder to 2 parts water. This ratio did make a nice brushable solution. My "part" was 16 oz, which used a little less than half of the 20 pound tub, and fits nicely in a 2 gallon pail. The Xypex went on pretty smooth; it's like painting with mortar. So it has a little texture. I could fill the joints between the blocks with a little extra and a trowel. I would use the pump sprayer to moisten the walls then apply the Xypex in sections, maintaining my wet edge.

I've been curing the Xypex by spraying it with water every 4-6 hours. I keep the door and the vents closed as to boost the humidity. Tuesday night will be my last round.

Xypex implies that I might need two coats for concrete block walls. I'm hesitant to do this, as I'm tired of this project, we don't get any standing water in the basement anyways, and I plan to put a basecoat of UGL drylock on the walls next. Apparently I'm supposed to wait 21 days until I can paint.

After moving 50 pounds of the stuff my arm was beat.

Saturday, March 11, 2006

Brown Recluse?!?!?!


This is the only spider that I've ever vacuumed that tried to put up a fight.

Please ignore our dining room wall paper.

Wednesday, March 08, 2006

How to be a 'Man' in the '30s

My wife doesn't like our Dining room light fixture. The original fixture was replaced a few years ago by the PO. Though we have quite a few records from when the house was built, we don't seem to have any information on the old light.

If any one has suggestions for a dining room light that would match a 1939 cape cod would be helpful.

Recently I was looking at old Sears house catalogs. It's very impressive that they had all of these houses "in stock". Is seems that no two are the same inside or out. That's certainly not like the local Dominion or M/I homes, where several layouts and facades are mixed and matched for a given neighborhood.

Reading some of the advertisements of cape cods for ideas I ran across this line, "Men are judged largely by the home they live in. A home like the Milford is a credit to you, your family and every neighborhood."

Saturday, March 04, 2006

It's a grind

Of course my efflorescence that I have is primarily Calcite. I've tried TSP ( both fake and real ) and a couple different types of acid, but with all the bushing nothing would remove it effectively. Also the calcite would stay and the cinderblock would be eaten away or marked by the wire brush. I didn't want to do it but I ended up using my trusty 4.5 inch grinder with a wire cup and wheel to grind off the calcite. I put a fan in the window to blow the dust outside and prevent the dist from filtering into the rest of the house. I thought it would take me a couple of hours. Only about 30 blocks needed to be cleaned.

6 hours later I had completed the job and I cleaned up the dust. I put plastic over everything, floor to ceiling. I removed the ceiling plastic first which of course showered more dust down on me. I got smart and sprayed water from the pump sprayer to knock down the dust on the rest of the plastic and rolled it up into the trash. Pretty minimal dust (compared to last time ) I'll be giving the walls a good washing tomorrow and be putting on the first coat of the Xypex hd-150. Well see...

Mold in the Desert

I had noticed lately that my Desert Spring Humidifier has been leaking. I figured it was because of the rigged up way I added a square piece of duct to the round cold air return. I figured the duct was sagging under the weight of the water and mineral deposits. Well it started leaking again this evening. So I thought to clean it out and adjust the float a little. Well, to my horror my humidifier is also full of MOLD! Greasy slimy BLACK MOLD. I've contacted DS to ask what's up. I figure they'll try to sell me an Auto flush for 130 bucks. Might as well throw in an anti scale water filter.

UPDATE 12.6.08: Well I did buy a Auto Flush and it does help. Next I'm going to try putting the disks into the dishwasher to see if that helps.

Thursday, February 23, 2006

Insulation Comments

I do a lot of research. That's partly how this blog started, because I could not find information from other people's experiences.
Thanks for your comments guys. I think they key with using cellulose is that it will be "dense packed" and that seems to be the key. It will be installed with a proper moisture barrier. Though the density may reduce the insulating value, it should block the air movement. Also this will be installed on the south facing roof deck only.

In our house the north-facing roof has experienced quite a bit of mold growth. I'm sure with the recent fixing of venting our bathroom fan outside is going to be a big help. The north face will still be open and allowed to breath. We've insulated the knee wall with r-30 batts and sealed off any air leaks we could find. Used a bunch of those Cans.

This dense pack cellulose is ONLY for the roof deck that is behind the knee wall on the south side. The 'true' attic (remember it's a 1.5 story cape) will have proper ventilation. If we remove all of the air from the cavities and we prevent moisture from entering and condensing then I think we'll be fine.

I would love to use closed cell spray foam. In my previous house I used Icynene brand, which was AWESOME. But the cellulose is a 10th of the cost and the insulation contractor I'm working with is a friend of mine, and I should be able to trust him. I'll still watch him like a hawk :-)

Sure I’m worried about what if a leak occurs and if the cellulose becomes wet etc. etc. That’s just more of the “joy” when it comes to home ownership.

So stay tuned. If we have any problems with this you will be the first to know.

Wednesday, February 22, 2006

Gutter Worries

I've been doing more research about our copper gutters and how they were installed. The copper gutters were installed with using galvanized screws ( SCOTS TRUGRIP GT ) After more research this does not appear to be really sufficient. Even though the gutters have only been up for 6 months, I think I’m seeing signs of a galvanic reaction between the screws and the gutters (white powder)

Also my other new worry is about the new pressure treated wood fascia they installed. I'm going to have to check but the wood might be treated with alkaline copper quat (ACQ). The fascia was installed with twist shank nails but I don't know if they'll be resistant to the corrosive nature of ACQ.

Insulation saga continues

I met with the insulation contractor. I showed him the work that I had done to get ready for the cellulose insulation to be installed. He came back over to, because I asked about some venting issues because we've had some moisture problems. He told me that instead of leaving open space for venting, we should dense pack the cellulose and remove all of the air spaces. My house does not have any soffit vents, and since existing fiberglass and the cedar paneling would cover the dense pack cellulose, it would prevent any condensation from occurring by blocking the movement of moist air from touching the cold roof deck. It sounds like a good idea. I think it will help with the general draftiness of the house.

Friday, February 10, 2006

House Blogs

I'm always scouring the web for information on how to do my work. I thought I would try to give back, especially about my more recent projects. There's just not a lot of practical experiences that are published out there available to people. Hopefully my additions will help people with their own projects. Feel free to comment or ask more questions. I'm always glad to help you with your projects. I work cheap, beer, pizza, and wings are my types of currency.

Wednesday, February 08, 2006

Basement water proofing

Our Cape Cod has a basement rec room. It's a nice room, with a fireplace, deep window wells and a stucco like ceiling. As I've seen in all previous houses that I've owned, the former owners didn't properly prepare the walls and have used a hodgepodge of paint and mortar the waterproof the walls.

My previous house had green latex over Thoroseal seal, over more green paint. It was awful. To waterproof that basement I used a grinder ( two actually ) and a wire cup ( 4 total ) to remove all of the layers. It took me a week of 8 hours a day to remove it all, and Ohhhhh the dust. We coated it with UGL and that seemed to work pretty well.

This house is no different, 3 or 4 layers of paint, 2 white, one green, and the bottom layer is a mysterious brown coating. It's the same old story of mildew in the corners, efflorescence on the lower bricks, peeling paint all over.

In my new house, and with the arrival of our first child, I did not want to grind off the paint. I looked at a lot of paint strippers. I wanted something that would work (duh), not be caustic, and not smell to bad, as I'm doing this in winter and I'm not opening any windows. I decided on the Peel Away line of products. The website for PeelAway isn't the best, but I'm a sucker for things I see on This Old House. I emailed the company about my situation and what I was looking for and they offered to send me 2 samples, Peel Away 8 and Peel Away 21. I did a couple of test areas with both 8 and 21. 8 uses the Peel Away paper but 21 does not. My results were that 8 worked really well, but 21 kind of dried out in a 24 hour span. I assume that the paper is what did the trick. 8 does not have much odor at all, no need to wear masks or gloves and it sure did munch through the paint after letting it soak, under paper, for 48 hours.

After discussing, with Barry (NY), that in Ohio we pronounce it SOUTH-ING-TON and not SUTH-IN-TON. I purchased 10 gallons of Peel Away 8. It's a bit pricey at about 30 bucks a gallon.

The Peel Away ( goop ) is nice to work with. The goop is a little thick to use a roller on but using a large paint brush ( 6 inches ) worked great. We put it on thick and then covered it with the supplied paper and waited 48 hours. It works pretty good. After removing the paper (48 hours later) the paste was still wet (in most places) and the paint was bubbly. Pulling off the paper actually did "peel away" some of the paint down to the concrete block. Scraping and using a wire brush (for the cracks and crevices) took care of the rest of the white and green paint. It looked good, EXCEPT for this mysterious brown "paint".

Thinking that the brown stuff was just more stubborn paint we re-applied more Peel Away and reused the same paper. 24 Hours later we removed the paper and wire brushed the wall down to the masonry and washed off the wall. Looks Great.

I kept wondering about what that brown stuff actually was. It sure didn't act like paint. More Peel Away would soften it so we could remove it more easily but it didn't act like the other layers of paint. Even when using a wire brush it would come off the wall with lots of water and in little teeny tiny chunks. So, it's not paint, and I don't want to be wasting my premium paint stripper on..... on What?

I've come to the conclusion that my mysterious brown coating is actually CLAY! I've heard of Bentonite Clay used for waterproofing on the outside... but the inside??? So, instead of more Peel Away it's just more water and wire brushing. I might even breakout the grinder again to help remove it ( gently of course ). Walls to look great though. I have a hard time with focusing on brushing the efflorescence away too. I might use the grinder for that as well.

Questions:
  1. Can anyone tell me about Bentonite ( or any other ) Clay used on the inside for waterproofing masonry?
  2. Any suggestions for removing efflorescence other than muratic acid, TSP and elbow grease. I would prefer not to use the grinder, and get more into the pores of the block.

Whole House fan

After a lot of research, I selected the Whisper Aire dual drive whole house fan. I considered the Tamarack but at about $1600 for a comparable model. I decided against it.


  1. I didn't find it to be very whisper quiet. Compared to my previous house and my Broan Model 2220 it is not as quiet.
  2. I have added additional levels and foam in between the layers of 2 by 4s to help with the noise
  3. The remote control only works directly underneath the fan. I contacted the manufacturer and they offered to send me a replacement, as it might be a bad solder on the antenna. It sounded like they are aware that this happens from time to time. I'm going to add a wire coil to the antenna side to see if that helps. The switch/ antenna is right next to the chimney in the attic and the drywall is very thick and might be blocking the signal.

Due to a cold snap I have not re tested the noise level.

Friday, January 20, 2006

Gass remote!

It totaly dumbfounded me a few years ago when I purchased my first house. The sweet old lady that I purchased it from, I met at the Closing. She handed me an extra key and told me it was for the gas man to get into the house and read the meter. I was really shocked that people still do that. It was a different time then. Of course I had the gas company come and install the remote meter.

Same deal with this house. No sweet old lady though. I actually called the gas company soon after we purchased the house to have the remote installed. This time though the gas company told me to call back in the spring. They said they only order so many a year, so call back then. I put a post-it note on my office wall as a reminder. I called back in the spring and got on the list and I was told it would be a few weeks. Months later, I called back the gas company and they assrred me that I was still on the list and that it would be soon. That was 2 years ago.

Today! Finally I got the remote. I used to call in the readings, but I started getting nasty notes on my bill about it not actually being physically read by a person, and they would shut off my gas. So I called again and the scheduled a time and came out. I thought it would be the same old type of remote that uses a wire. But no! It's wireless. Took the guy about 10 minutes. Supposedly the battery lasts 18 years. Perhaps in the future they will power it with a fuel cell and the natural gas.

Monday, January 16, 2006

Vent fan outside!

We're embarking on improving the efficiency of our house. We will be putting cellulose insulation into the attic when we're all done. A few projects need to occur first. These include
  1. A whole house fan
  2. Venting bathroom fan outside.
  3. Replace the attic fan.

This weekend was spent with running a vent outside for the bathroom fan, about only 2 and a half feet long. I looked around for a really nice high quality outside grill but I didn't have much luck. I settled on the standard 3 louver plastic vent, and I used that aluminum stretchy pipe. I purchased a 4 inch hole saw to cut a really nice opening. It worked great. I though this would take me 10 more minutes before I would be able to get out of the bad weather. No luck of course. The hole is an accurate 4 inches in diameter, but the plastic louver vent is one eighth inch larger. NUTS! I enlarged the hole with my trusty dremmel and a sand paper attachment, but that took another 15 minutes and was a real pain. When the vent did fit I caulked it and attached it with 4 stainless steel screws. Works great. Now that should help clear up the mold in the attic too.

Saturday, January 07, 2006

Ironing the wrinkles out

Or little bundle of joy has taken up residence in the same room as the ironing board. It has now been a few months of putting up with my wife ironing on our bed at 6AM. I went out to Lowes and WOW I couldn't believe it how expensive those in wall ironing boards are. Actually, I purchased the ironing board last May but I never got to installing it.

After much deliberation my wife and I decided to install the ironing board actually in the upstairs hall way. That way it would be quieter for the other sleeping party (me). I needed electricity to the area as well so I ran a wire from one of our sockets, up and over through the attic and back down. Cutting the old plasterboard was quite messy. I should have put more cover over our open pore oak floor. Now the floor looks like it has white head zits. They will come out the next time I wax.

The chosen location was next to our bedroom door. The wall cavity is just an inch too small. I guess the door get's in the way. Out came the mighty reciprocating saw and it smote the wall stud. Fortunately it is not a loadbearing wall. How do I know? Because the wall runs parallel with the ceiling joist, and the joist is attached to the roof rafters. I don't expect any problems with the drywall. Our house has plaster board, browncoat and the finish coat that adds up to about an inch thick.

In the near future I'm going to shellac the door to try to match it to the rest of the wood work. Probably about the same time I get around to finishing that railing.

Tuesday, November 08, 2005

New Copper gutters

The Previous Home Owner Sage, final chapter has been written. Our new copper gutters have been installed and they do look great. The sales guy was right when he said that they would look like crown molding on my house. They actually do and they look really well integrated with the house, and of course the most important part, is they actually WORK. I left work early the other day so I could stand out in the rain (under an umbrella ) and check them out.

We had gotten a few estimates for half round copper to replace the existing half round on the house. My main issue was though I wanted leaf protection too. When a gutter company knocked on the door I was skeptical. They were selling "k style" ogee gutters with toppers. I said "I want copper" and they said "we do copper" . After going through the crap of the price, and we'll give you a discount if we can put a sign in your yard, bla bla. It's the same old story that any sales company gives you. We ended up paying $30 bucks a foot, and the sales man even admitted to me later that I could have whittled off another 500 bucks or so from their price. The company Gutter Genie. They also offered 2 years same as cash.

Despite my constant worry and my buyers remorse I agreed to let them do it. I really wanted operational gutters and these guys had what I wanted. Like I said before they work great. I did not go with their rectangular downspout, but kept my original copper round downspout. Why pay for something that already works. The sales guy was honest that topper systems like this don't block all debris, but 95% he said. "Maple seeds are problematic" he said. If I went with the rectangular downspouts then there would have been cleanouts on them. I'm going to add cleanouts later in 2006. Hopefully before our maples shed their seeds. I might order cleanouts from Slate and Copper.

The installation took a week to do, and fortunately we had nice weather. They put on a new pressure treated fascia board all the way around, and primed it. The fascia was needed to leave the correct reveal from the bottom of the last shingle to the top of the copper topper. They attached the fascia with twist shank nails every 16inches or so. The gutter its self is pretty massive. The back of the gutter covers the entire fascia. The gutters were continuous, and they use some sort of large plastic bracket to attach the gutters every 16 inches with 5 screws in each bracket. They attached the topper to that bracket too and to the back of the gutter. Then a copper drip edge. Lots of copper. My neighbors were joking the other day that I'll be out there weekly keeping them polished.

A couple of SNAFUs ensued though. Firstly it seems that Gutter Genie is an aluminum gutter company that realized they could run copper through their gutter extruder. I had to explain to them that they can not use steel zip screws on copper as you will get a galvanic reaction when they get wet. They also claimed the screws that attached the gutters to the fascia were titanium, which according to the manufacturer of the screws is totally untrue. As we live in a fairly dry area and those screws should almost never get wet then they should be ok, and they are galvanized so that will help for a while. As long as the gutters last another 30 to 40 years until I sell the house then that's fine with me. The gutter installers also dropped one of the gutters and knocked off my front porch light. I was able to get it rewired at Bernard Electric Supply Co. I got an exact match on the glass from Franklin Art Glass.

Sunday, May 01, 2005

Cleaning my Humidifier

It's May day therefore it's time to shut down the humidifier. It seemed to work pretty well all winter. It was really, REALLY cruddy. I didn't realize that our water was that full of stuff. The disks, the clear plastic cover and the reservoir were all full of deposits. It was all fairly easy to clean out. They manufacturer suggests using vinegar but I found just running water was enough to remove the crispies. Turn off the water, unplug the transformer, and close the damper and it's ready for next year.

Saturday, March 05, 2005

Insulating the baby's room

I wanted to take care of the messy job of insulating the baby's room before the little tike arrives. We've had a few mice appear in places in the house, so It's time to take care of things like that before the spawn comes.

Behind our knee walls we have storage on one side and closets and drawers on the other. Apparently, when the house was built, it had cedar shake roof. I can tell by all of the cedar shake remnants that are junking up the attic. The house was very nicely insulated for a 1939 house. But they put the insulation on the underside of the roof sheathing when they built the house. This is fine for a cedar shake roof that will breathe and allow moisture to escape. Not so for a modern asphalt roof with plywood sheeting. Moisture to build up, rot and mold will occur if there's not sufficient ventilation.

All of that insulation on the underside of the sheeting, in the knee walls had to come off. What a terrible, messy, icky job that is. It wouldn't have been that bad if it was just insulation but (remember that old cedar shake roof junk? ) It and the old nails, and tree leaves would come raining down on me as I would remove each piece. Most of the cedar shakes apparently slit down to the bottom of the roof cavity in the knee wall. After removing each 8 foot piece I would roll it up and then put it into a trash bag. One bag per roll. I removed about 40 bags. good thing too, on the north side , the mold was incredible. I sprayed it with some bleach and it will dissipate in a few years anyways as I've removed the moisture source and the moldy sections will be sealed off from the living space again.

After the insulation was gone. I rented one of those cellulose blowers from lowes and about 30 bags of insulation. I proceeded to insulate the floor of the knee wall and filled the floor joist cavities with cellulose. In the closets I installed a "pergo" floor. I added insulation to the walls that were previously un insulated and then put sold cedar up to finish it off. It's the nicest closet in the Village. I repeated this with the other knee walls we have (well still working on that)

We also have these wonderful, deep, 3 drawer built-ins, one in each room. They too are un finished to the back of the knee wall. Quite drafty too. I pulled out the drawers and removed one of the slats between the drawers so I could squeeze into the knee wall, as those sections they were my only openings. I removed the insulation covering the underside of the roof deck. I added the cellulose insulation to the cavities of the floor joists. Since this wasn't a closet I installed R30 batts of fiberglass insulation onto the knee wall's walls. I then enclosed the drawers with plywood (covered in r30) and some spray foam to seal out the drafts.

Sunday, January 09, 2005

Plug the heat

To facilitate the ease of attaching my furnace to the backup generator I've installed a plug on my furnace. I'm sure exactly if it's code, but the plug and socket are sized appropriately and it's electrically grounded. It should be fine. Now I can just plug my furnace into my generator. I'm sure that I will be glad and use this convenience a bunch of times (Ha!). One benefit of this is now I can get arid of the extension cord that connects the humidifier.

Friday, December 24, 2004

My new emergency generator

Christmas came early this year. Yesterday we suffered through a 18 hour power outage. There are people that are going to be out for days they say. The ice storm cut out our power at about 3AM. It finally came on around 6pm. Unfortunatly it was about 5 minutes too late. My neigbor had run out at 6am that morning and picked up a couple of generators. We put the oil in the second one, that I was going to purchase about 5 minutes before the power came back on. Now I own a $500 dollar backup generator. We'll see how many times I ever use it.

Tuesday, November 16, 2004

Power for the masses

Finally! Another part of our Previous Owner Saga has come to a close. Despite my photographic evidence the electrician that our previous home owner hired still claimed that the damage to the breaker box occurred after we purchased the house. I had taken pictures of the house when we looked at the house the first time as well as when we had our inspection. Guess what, nothing was ever fixed. Again though home guard was accommodating. The electrician sent them a letter saying the damage was after he had "fixed" the box so home guard accepted our claim. This time it cost us $300 bucks for the new box and breakers. It's a $100 deductible then and additional $200 to upgrade to a 200 amp service. It looks nice though. I had the electrician leave room at the top if I want to add whole house surge, or a lighting arrester. Perhaps a backfed breaker for a generator in the future.

Friday, November 12, 2004

Desert Spring Furnace Humidifier

Things are a little more moist around the house. I installed a Desert Spring Furnace Humidifier over the weekend. It's designed to go on the cold air return, but my cold air return is round, not square. Off to the hardware store for some sheet metal where I banged out a square duct that would be big enough to accommodate the humidifier. I had it installed in a couple of hours, and it certainly works. It's quiet. It comes with a Honeywell humidistat. I have a couple hygrometers around the house and they now say 50% or so. I have the humidistat set at 45% and it's still running. If I turn it down then I can hear it click off at 37%. So I guess it's just off or the house is expelling a lot of moisture ( and my heat ). We'll see how is goes during the winter and how it cleans up in the spring.

The humidistat only controls the rotation of the disks in the humidifier. It does not stop the water from flowing into the reservoir. Despite the disks not spinning, I would guess that some water still gets into the air. I have not seen any comparison of evaporation vs. moving and non-moving disks.

Thursday, November 11, 2004

Drip, Drip

Well, this is getting more annoying all the time. We asked for a couple of things to be done when we purchased the house. Fix the stuck faucet, leaky toilet, gutters and electrical. Except for one new downspout, it's very clear that NOTHING was done. The previous owner now lives in California, she had a former boy friend watch things and handle the closing of the house. George was responsible for getting the repairs done, but it's clear now that he did nothing what so ever. Granted a plumber did come and put a new ring on the toilet, but did he actually look at the problem and diagnose it correctly? Nope!

It turns out that our leaky toilet is actually caused by a crack in the joint that connects the waste from the sink into the waste from the toilet. It appears that the joint had come loose. The bathroom floor is tiled and bedded with about 3 inches of concrete.

I used some epoxy putty to seal the bottom of the pipe and to stabilize it. I used my Dremel to rough up and clean the pipe for good adhesion. After the putty cured I removed the toilet and used marine epoxy to fill and smooth the crack from the top then I even added some fiberglass to help meld the two parts. I hope it works.

Wednesday, November 10, 2004

The stairway to, upstairs.

I think it's true in most Cape Cods that our stairs are quite steep. For some strange reason we don't have a railing in all the way up. The pretty railing we do have only goes up about a quarter of the way. I didn't want something that was going to take up a lot of space even if that means they don't match in style, so I opted for the round wood one. I ordered a maple one but it never came in. Maple would match our Birch trim that we have in the house. Now my pregnant wife will not have trouble getting up or down the stairs.

Sunday, May 09, 2004

Vacancy Insurance

Our old house is STILL on the market. Well because of changing my wife's auto insurance to mine, her agent found out that her house is now 'Vacant'. Vacant meaning, no furniture in the house. Typical home owners insurance is only for 'occupied' houses. Now that my wife's house was vacant they canceled the policy. That's a problem. No insurance means the mortgage company will foreclose. I talked to my agent (Nationwide) and a bunch of others and scoured the net for someone that would insure a vacant house. I couldn't find anyone that had vacancy insurance. It's pretty ridiculous because the house is in a nice neighborhood, well kept, and shouldn't be vacant for long. In desperation I contacted the Ohio Insurance Institute and they directed me to Associated Insurance Agencies. I was worked with Tim Bowers and he set me up on a Vacant Policy written through Miami Mutual of Troy, Ohio. Not cheap about $400 a quarter, but still cheaper than foreclosure.

Saturday, May 01, 2004

Rocks for the ages

A good friend of my mother (Gerry Krabil) retired from the rock business. He salvages old barns and bridges for their stones and then carves decorative planters and birdbaths. Nice stuff. Unfortunalty he hurt is shoulder and can't work with the large and heavy stones. Tom Roig, Owner, Landscape Contractor. T & B Landscapes was nice enough to haul them to our house and install them. We enjoy sitting on them for Beggars Night and pass out candy.

Sunday, February 29, 2004

Thank you home guard

I went down stairs today to get the laundry and found quite the river down in the basement. Apparently the hot water heater's pressure valve went off and is now leaking water down the floor. Fortunately as we just purchased the house a few months ago we have a home warranty. I called Home Guard and they had a new hot water heater here in a couple of hours. I thought they would just replace the TnP valve, what a pleasant surprise. According to the plumbers they said that Home guard was the more accommodating of the home warranty providers they work with. $100 and POOF! A new hot water heater. The guys were even nice enough to replace the faulty shutoff valve that was on the cold water line for the hot water heater. Gratis!

Friday, October 10, 2003

Our new House!


We've finally moved into our new house. It's a wonderful cape cod with cedar siding. It was built in 1939. It is basically all original inside. The previous owner did put in a new kitchen with some nice appliances the rest of the house is essentially untouched. The rest of the house has random width peg oak floors. The living room has beech wood builtins and a fireplace. The dining room has a true bay window and another beech corner cupboard. The 2 baths still appear to have their original tile and fixtures in working order. The upstairs bedroom has builtin drawers and funny little doors to access the storage areas behind the walls.